Extending your Build and Release pipeline


The new build and release engine that ships with Visual Studio Team Services and Team Foundation Server 2015 (The Release Management bits shipped with TFS 2015 update 2) provides a whole new way of configuring your Continuous Integration and Deployment pipeline. A much improved and simplified way. You may have invested in the build and release features of previous versions, or you may be treading into uncharted (or currently not yet supported) territory for your own applications. That territory isn’t a swamp nor is it a desert; it’s actually not that hard once you know where to start. Let this article be your guide along the way.
Run existing scripts
The existing build and release library of tasks is already quite extensive and consists of a set of predefined tasks that you can use to author your build and release pipelines. The tasks are divided into five categories: Build, Utility, Test, Package and Deploy. You have total freedom in choosing which ones you want to use and in what order. Most of the tasks come with a simple configuration UI, which allows you to tune their behavior. If your build process is relatively simple, you will probably not need to extend the process at all. You will only need to pick the right tasks from the library, put them in the right order and configure them.
There are also a number of standard tasks that offer your first extension points:
- The Build category contains tasks that allow you to run a number of standard build and package management tools, ranging from MSBuild, NPM, Gradle, Grunt to Ant and Gulp.
- The Utility category contains tasks that allow you to run PowerShell and Batch scripts on Windows as well as Shell scripts on other platforms.
- The Deploy category contains a number of tasks that allow you to interact with remote machines, including Azure PowerShell, Docker and Chef.
The common element of all of these tasks is the fact that they execute scripts that you’ve included in your source control repository. This has the advantage that it’s easy to version these scripts with your code, but it also introduces a coupling between your build pipeline and the scripts in source control. Given that their contents are not visible when looking at the pipeline, they can also make the build and release process harder to understand. However, what’s nice about these extension points is that you can use the technologies you are already familiar with to extend your build pipeline. It also allows you to port over your existing build pipeline without too much trouble.
Tip: In order to quickly iterate while writing your script in the context of the Build system, you’ll find the Run Inline Power Shell and the Shell++ task very useful. They allow you to run a script defined completely in the task UI. However, after you’ve debugged your script, it is recommended to check it in and use the existing PowerShell and Shell Script tasks to run them.
Grab an extension
If you don’t have an existing script that does what you want, and writing such a script isn’t an easy thing to do, you should check out the Visual Studio Market Place to see if there is an existing extension that offers the functionality you’re after.
Extensions are installed into your Visual Studio Team Services account of Team foundation Server (requires 2015 update 2 or higher). Extensions can carry one or more build tasks as well as other types of extensions, such as Dashboard Widgets or 3rd party features.
Tip: You may also find an extension which provides most of the features you need. Since most extensions are released as Open Source, they may provide a starting point to build your own extension, or you may be able to provide the added functionality in the form of a pull request or raise an issue with the developer on their GitHub account.

A side note on variables
When you start making your scripts re-usable in different contexts, you will likely want to pass data into your scripts. There is a long list of pre-defined (well-known) variables available which you can reference directly from your existing build scripts through environment variables. It is highly recommended to use these well-known variables It is considered bad practice to rely on the availability of custom variables, as these will be hard to discover for other people. Instead, consider passing these values as arguments to your scripts.
Wrap your script in a task or create your own
If you can’t find a task in the standard library nor an extension in the Marketplace to extend your Build and Release pipeline, you have the option of writing your own task. You may also want to wrap your existing scripts in a task to provide a nice UI user interface to make it easier for others to consume.
Tasks can be written in two languages: TypeScript (which compiles to Javascript) and PowerShell. TypeScript will run on all platforms, whereas PowerShell will only run on the Windows Platform. If you consider sharing your task to the Visual Studio Marketplace it is recommended to use Typescript in order to reach the broadest audience.
From your task you can call out to other technologies, any executable or shell script. It is also possible to call directly into .NET assemblies from the PowerShell host. Communication between your task and the agent’s host process is done through specially formatted log messages or through the corresponding methods of the VSTS Task SDK. The minimal components required for a task are:
task.json– The task manifest which describes the task’s input parameters and the main entry point.- A
.jsor.ps1file – The actual script that is executed as configured in thetask.json.
If you want to interact with the task host - to receive input parameters and read any variables - you will also need to reference the vsts-task-lib matching your chosen script technology. A build task can package both PowerShell and a Javascript. Depending on the agent’s capabilities it will select the appropriate implementation based on the order defined in the task.json. You can include either PowerShell or Node, or both. Be sure to give each task a unique id and to increment the version number each time you publish a new version. The minimal task.json looks like this:
{
    "id": "3333333-3333-3333-3333-333333333333",
    "name": "PingTask",
    "friendlyName": "Ping",
    "description": "Pings a remote host to see if it is alive.",
    "helpMarkDown": "[More Information](http://www.example.org)",
    "category": "Utility",
    "author": "Jesse Houwing",
    "version": { "Major": 0, "Minor": 1, "Patch": 0 {,
    "minimumAgentVersion": "1.83.0",
    "inputs": [],
    "instanceNameFormat": "Ping $(RemoteHost)",
    "execution": {
        "PowerShell3": {
            "target": "$(currentDirectory)\\myscript.ps1",
            "workingDirectory": "$(Build.SourcesDirectory)"
        },
        "Node": {
            "target": "$(currentDirectory)\\myscript.js",
        }
    }
}
There is little documentation on the task.json options and structure; the best reference to date is the vsts-tasks library on GitHub and the repositories of the open-source tasks. You may encounter a third task execution target called: “Power Shell” (note the lack of a version number). This is the task host that shipped with TFS 2015 and is considered deprecated with the release of TFS 15 and the latest VSTS build agents
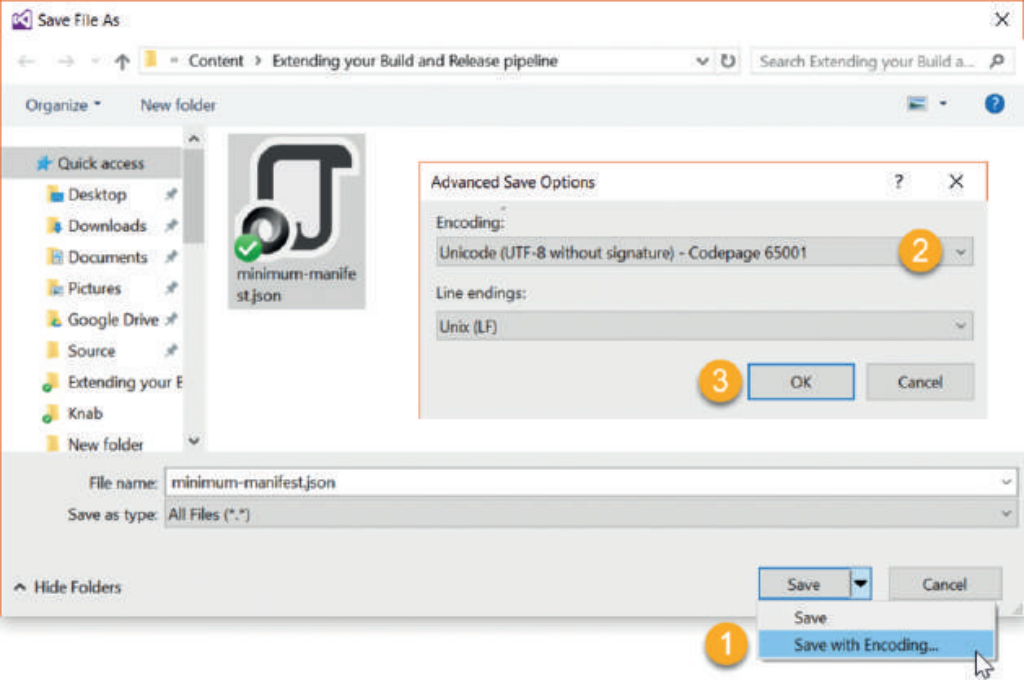
Note: be sure to save the task.json as UFT8 with no Byte-Order-Mark (Signature), or your task may fail to upload or will not show up correctly:
Tip: You can use the Cross Platform TFS Command line tool to create a skeleton task using tfx build tasks create.
Put the logic you need in the Javascript or PowerShell file. This small example tries to ping a host and returns the result:
$remotehost = www.example.org
[string] $output = (ping $remotehost)

if ($output -match "Pinging")
{
    if ($output -match "\(100\% loss")
    {
        Write-Output "##vso[task.logissue type=error;]Could not reach $remotehost"
        Write-Output "##vso[task.complete result=Failed;]FAILED"
    }
    elseif ($output -match "\(0\% loss")
    {
        Write-Output "##vso[task.complete result=Succeeded;]DONE"
    }
    else
    {
        Write-Output "##vso[task.complete result=SucceededWithIssues;]DONE"
    }
}
else
{
    Write-Output "##vso[task.logissue type=error;]$output"
    Write-Output "##vso[task.complete result=Failed;]FAILED"
}
Upload your task to Visual Studio Team Services or TFS using the cross platform command line tools:
tfx build tasks upload --task-path c:\folder\containing\task.json\file --service-url http://youraccount.visualstudio.com/ DefaultCollection You will be prompted for a Personal Access Token when you are uploading to Team Services or for your account credentials for TFS (use Fiddler or an NTLM authentication proxy to authenticate against TFS 2015). The task will then be available for all users of the target account / project collection.
Extend your task with a User Interface
To extend your task with a UI, update the task.json and define one or more input elements. Inputs can be of different types, e.g. filePath, string, boolean, picklist, radio or multiLine). The UI does not provide a lot of ways to do validation, so the script included with your task will have to provide for this. To make the remote host configurable in our current task, add a required string-type input:
...
"version": { "Major": 0, "Minor": 2, "Patch": 0 },
"inputs": [
    {
        "defaultValue": "www.example.org",
        "helpMarkdown": "Hostname or IP address to ping.",
        "label": "Remote Host",
        "name": "RemoteHost",
        "required": true,
        "type": "string"
    }
],
"instanceNameFormat": "Ping $(RemoteHost)",
...
You will need to package the PowerShell or Typescript task SDK with your extension. Since the example uses the PowerShell3 host, you will need to download the VstsTaskSdk module and put it in a subfolder named ps_modules\VstsTaskSdk, in alongside the task.json. We can now use the commands provided by the Task SDK to retrieve the input value and to set the outcome of the task:
$remotehost = Get-VstsInput -Name "RemoteHost"
[string] $output = (ping $remotehost)
if ($output -match "Pinging")
{
    if ($output -match "100\% loss")
    {
        Write-VstsTaskError "Could not reach $remotehost"
        Write-VstsSetResult -Result "Failed"
    }
    elseif ($output -match "0\% loss")
    {
        Write-VstsSetResult -Result "Succeeded"
    }
    else
    {
        Write-VstsSetResult -Result "SucceededWithIssues"
    }
}
else
{
    Write-VstsTaskError "$output"
    Write-VstsSetResult -Result "Failed"
}
If your task depends on the presence of third party tools, you should either package them as part of your task or define a demand in your task.json. If you ship a third party component, validate that its license is permits redistribution. When using a demand, your task will signal the consumer to install the third party prerequisites on the build server.
Release your task as an extension
The Visual Studio Marketplace makes it easier to create tasks and to share them with the community. To share your build task as an extension, follow the steps outlined on MSDN . You can also use the Build and Release Tasks for Team Services Extensions to automate the build and release pipelines of your extensions.
Conclusion
As you can see, the process of writing a simple build task is easy. Although the documentation is currently still evolving, there are enough examples available, by means of the standard tasks as well as tasks shared by the community.
The fact that both the Build and Release functionality depends on the same task library makes investments in custom tasks even more useful.
If you feel your tasks are useful to others, share them to the community by pushing them to GitHub and publishing them as an extension to the Visual Studio Marketplace. If you find gaps in existing extensions, join the effort by submitting issues, or better yet, submitting a pull request.
Everybody benefits!
This article was originally published as part of Xpirit Magazine 3.